Friday, February 27, 2009

Virtual Notebooks: Evernote


Today's virtual notebook is Evernote. This is the last virtual notebook I will cover so you can sleep well knowing that we will be on to a new subject soon. (I like to keep some posts grouped by subject so that you can compare them a little more easily.) To use Evernote, you will need an account. You don't have to download the program if you want to just use it online. However, downloading the program and using it online is the best way to get the most out of what Evernote has to offer.

Basic Concept: Evernote merges the "live" concept of document creation with the "native" concept. That means that Evernote is installed on your hard drive and can be used offline. When online, the program syncs with your online account and uploads anything you have created while offline. You can create and edit notebooks both online and offline and the changes are carried over between the two as you work. Why is this a good thing? Well the major disadvantage of Google Notebook is only being able to use it online. OneNote works offline and can be used online but not without a great deal of trouble. Evernote allows you to work offline and online in a way that is both easy and efficient. So lets walk through the basics. Here is a screen shot of the installed program:
  • The organization is the same as any virtual notebook program (Notebook > Section > Page) except you don't create sections, you create "tags". Notebooks are seen on the far left, notes are displayed in the middle window, and the specific page is displayed on the main display.
  • You will notice that there are not sections to divide the notes. However, you can add tags to notes and organize your note according to the tag. The concept is actually very workeable. To me, the reading panes make it look like an e-mail mailbox (Outlook, Mail, Etc.).
  • Here is the web version of the same note:
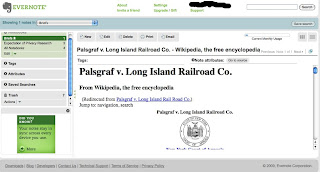
  • The web notebook looks like Google Notebook but more polished. You can create notebooks by selecting "edit" (located under the notebook dropdown on the left pane) and selecting "new notebook." New notes are created by selecting "new" on the menu bar. Everything else is pretty straight forward.
Features:
  • Sync: syncing is performed automatically at a regular interval. You can, however, sync the the notebooks manually using the sync button. Syncing literally uploads and downloads any changes made between the web-based and desktop-based portions of the program.
  • Take notes while browsing: similar to Google Notebook, you can take notes while browsing by adding the Evernote add-on to your browser. It shows up as an icon on your browser. By clicking it, a small window appears that will allow you to type notes into any of your notebooks.
  • Web-page Capture: One of the image above shoes a wikipedia article on a famous tort case. I wanted the information from the page so I used Evernote to copy the entire page. I did this by pressing Ctrl+a, right clicking on the highlighted text, and selecting "Add to Evernote." This brought up the note window with a small picture of the information I just clipped. This allows you to save almost anything you find on the web. You can also clip pictures by right clicking on the picture and selcting the "Add to Evernote" option.
  • iSight (Mac): if you want to keep a record of reciepts or other documents that are hard copy, you can use Mac's iSight (web cam) to take a picture of that document. The picture is then placed in your notebook and is even searcheable - Evernote will process the text so that you can search it later.
  • Searches: Evernote allows you to search documents for specific words (OneNotes does this as well). This comes in handy when trying to sort through notebooks that may contain a lot of information or even large documents you clipped from the web. Here is what the results look like:

Why I like it: I like that Evernote is free and easy to use. I love the way that it has married the concepts of online and desktop notetaking. Evernote is probably the best free option on the market for virtual notetaking. All you have to do is play with it for about 20 minutes and you will be hooked. I suggest just trying it out and using it to take notes at work, school, or at home.

Why I don't: The text editing is very basic. It really detracts from the overall experience when you can't make outlined lists and edit text in as rich a format as OneNote. However, to me, this is not a good enough reason to not use the program - so get out there and try it.

In fact, try all the notetaking programs I have mentioned. They will truly help you stay organized in whatever capacity you take notes for. Just think of the stuff that you want to remember, and use one of the programs I have mentioned to do it. If you like it - all the better!

Thursday, February 26, 2009

Virtual Notebooks: Google Notebook

Yesterday we discussed OneNote, a very good program for native use (you have to install it on your hard drive). Today we are going to talk about Google Notebook, a very good Web-based program that requires access to the internet but no installation.

Basic Concept
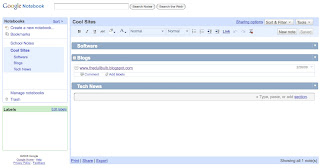
: Take a look at the home page:

  • On the left, you will see a list of the notebooks. Create new notebooks by clicking on "Create a new notebook" link. You can then name your notebook. If you need to rename it later, just click on the title where it shows up above the notebook's contents. You can also you use the "tools" dropdown menu. When you click on a notebook, it opens it and displays its contents. The open notebook displayed is "Cool Sites."
  • Sections are displayed as blue bar headings. Sections are created by simply clicking the blank space inside a notebook and selecting the "add Section" link. That will place a blue bar dividing your notebook and prompting you to name it. The sections in the picture above are Software, Blogs, and Tech News. These different sections can be made to show and hide their contents. The open section is Blogs and it is displaying its only note.
  • Notes are created under each section by selecting "Add Note" from the toolbar or by clicking in the blank space of a section and simply typing. You can type notes and edit the text using the very basic text editing options. The picture below shows the basic toolbar for text editing. You can change the font, bold, italics, underline, color, bullets, numbering, spacing, hyperlinks, undo, redo, and remove formatting. You will also notice the "New Note" button.
Features:
  1. Get access to your notes from anywhere: Notebooks are saved online and you can access them anywhere where you have internet access. Simple, straight-forward, easy.
  2. Take Notes while browsing: Many browsers (especially Firefox) allow for a Google Notebook Add-on which enables you to take notes while browsing. Lets say that I am looking up information on the Fourth Amendment and the Exclusionary rule. If I find a site or information that I like, I can click on bottom right corner of my browser and type notes as I am reading. I can also create a hyperlink in my notes for future reference. If I find a quote I like, I can highlight it, right click and select "Note This" and it will go into my notes. Here is an examplel:
  3. Easy Sharing and Collaboration: You can click the "Share" link and collaborators to the notebook. Say you are in class and want to take notes collectively with a study group - or perhaps you are working on a project at work and need to collaborate with coworkers. Either way, Google Notebook makes sharing easy to accomplish.

Why I like it and Why I don't: Google Notebook is not a whole lot different than Mircrosoft's OneNote on a basic level. However, if you were to use OneNote for a while then switch to Google Notebook, you will likely find that Google Notebook is a little different conceptually and may even feel like it is harder to use. If you were to switch from using Google Notebook to OneNote, you would find that OneNote offers a lot more in the way of features and functionality. Google uses the same structure (notebook > Section > Page), it does it differently and perhaps a little less cleanly. This is mostly because Google Notebook is a purely a web-based application while OneNote is installed on your operating system. Applications on the web take away fundamentals like the functionality of a right click. However, Google Notebook may be exactly what you are looking for in a notebook application, especially if you are always online.

Google Notebooks is perfect for simple note taking. It doesn't have all the bells and whistles that OneNote has and it certainly does not have the rich text editing. That may be a problem for users that are looking to take extensive, quality notes for school or work. OneNote is the more effective option for the virtual notebook "power user". However, if you are just looking to take notes at school, research, work on the web, websites you like, make simple shopping lists, to-do lists, or whatever - Google Notebook is a great option and its FREE.

Tomorrow I will discuss Evernote. It combines the two approaches we have discussed, allowing you to install the software AND use it online... and its free.

Wednesday, February 25, 2009

Virtual Notebooks - OneNote

We already covered free and live web-based office applications. Now lets talk about another novel concept: live notebooks. Virtual notebooks enable you to make notes in a highly customizable way. You can use notebooks to make your own notes for school, shopping lists, in a meeting, or literally whatever you want. You can paste in documents from outside sources, share the notebooks on the web, and a host of other things. Personally, I use virtual notebook software for notetaking and productivity at school. I am likely to continue to use one as long as I can in work, at home, wherever. We will cover 3 of these notebooks over the next 3 days.

OneNote
: First, this program costs money. I don't usually talk about programs that cost money but OneNote is a pretty good one and most people have it and don't know a thing about it. So I will cover the basics of what you can do with it. I suggest simply experimenting with it to learn the most. While I am mentioning OneNote first, I don't necessarily think its the best at everything - over the next two days I will be explaining two other free programs that are pretty awesome.


Basic Concept
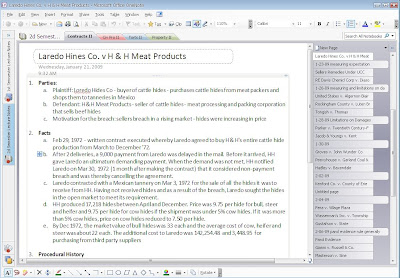
: To understand the basic concept of how OneNote works just think of any normal, physical notebook. You buy a binder or notebook at the store, divide it into sections (school subject, work projects, home tasks, or whatever), put paper in each section, and even hole punch other papers and place them in. OneNote has the same basic structure. Take a look:

click for larger image

  • Okay, first look at the left side of the screenshot. You will notice that there are two tabs representing the two notebooks I have open. I am in the "2d Semester" notebook.
  • Now look along the top, below the tool bar. You will notice 4 different tabs. Those are basically the dividers in the notebook, seperating it according to subject.
  • Now look to the right hand side of the screen. Those are the pages in the notebook. The beauty here is that each page can be as long or as short as you want and can even include subpages. The tabs that look longer are main pages while the tabs that look shorter are subpages.
That is the basic concpet of the OneNote notebook. You can do all kinds of things on each page: make shapes, type text on literally any portion of the notebook, and insert pictures, pdf's, word docs, presnetations, etc.

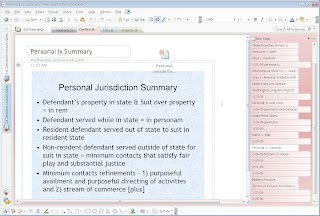
OneNote Printer: If you have OneNote installed on your computer, you may have noticed that when you go to print a word document, for example, that a printer shows up called the OneNote printer. The OneNote printer prints documents into OneNote, as if you had scanned the document and pasted the picture into your notebook. Take a look:


Notice that I have pasted a teacher's PowerPoint presentation into my notes. The benefit of this is that you can maintain the look of a document and edit over the top of it at will. You cannot, however, edit the document once you have "printed" it to OneNote. You can also insert documents as text only, which will allow you to edit the text later but basically strips it out of the original format into a somewhat unmanageable one. Either way, being able to print documents directly into a virtual notebook comes in handy.

Extra Features: OneNote allows you to make Notebooks public. Bascially this means that you can share your Notebook and work on it "live" with another person at anytime. When you set up a new notebook, you will be prompted with the question of whether or not to make it a shareable notebook. Even if you select no, you can still share the notebook later by clicking "Share" on the menu bar. This will allow you and a co-worker, friend, whatever to edit the notebook together and OneNote will sync changes live so that you don't undue the work of another. Its pretty great.

Why I like it: I love the structure and interface of OneNote. It is certainly a polished application. Microsoft has combined the power of Word with the concept of a notebook in such a way that you feel like you can literally use it for whatever you want. If you have a scanner, you could even organize your personal records with OneNote and make the document password protected. Its very powerful, the text editing is quite rich, and the interface is sleek. These features are most certainly OneNote's bread and butter.

mmm, bread and butter

Why I don't: It costs money and there are very strong alternatives. You can get a lot of the features you like about OneNote in programs like Google Notebooks and Evernote (coming tomorrow and the next day). OneNote lacks in its ability to sync notebooks quickly and easily to the internet as well as share the notebooks with others. While the sharing feature in OneNote is pretty cool, its not as intuitive as it could be and indeed should be. In the coming days, I will be featuring two other applications that do a lot of things much better than OneNote. What OneNote does extremely well with its interface and rich text editing, it lacks in other areas that may be more important to the end user... That's YOU!

Tuesday, February 24, 2009

It's Google Docs Yo!

Have you ever typed a document on your computer then had to transfer it with a USB device or by e-mail to print it on another machine? Have you ever been somewhere without your computer and needed access to a presentation or document that you created? Have you ever just wanted a more convenient way to make, share, and preserve documents and spreadsheets? Meet Google Docs

What is Google Docs? Basically, its a web application that makes documents, spreadsheets, and presentations without the fuss of annoying things like: using money, opening 3 different applications (Word, PowerPoint, Excel), attaching and e-mailing documents to yourself, etc. Google Docs is a convenient way to create, edit, collaborate, and share files. The interface is very simple, the features are simple, so I will keep this post simple. Here are the basics:

First: Get an account. You may already have one if you have a gmail account. If not, click on the Google Docs link above, follow the steps to either creating a new Google account OR using an existing e-mail account (hotmail, yahoo, whatever).

Docs Home: This is the front page. From here you control all that Google Docs has to offer.
dull bulb: "Click to enlarge image"
you: "Oh really, like I didn't know that?"
dull bulb: "Fine, I won't say it anymore"


New: When you need to create a new anything, you click on the "New" dropdown box. This includes the creation of new folders to organize your crap. Put school documents in school folders, presentations in presentation folders, work in work, you get the picture. Or you can just keep it all in one (but that's unorganized, inefficient, and yucky - do you what you want though...)Upload Files: Do you have a file that you want to work on using Google Docs? Just use the upload feature. You can also e-mail files directly into your Google Docs Home by e-mailing them the the address it gives you at the bottom. I kept mine off to keep the freaks away.

Share: Stop! Collaborate and listen, Ice is back with a brand new edition... I'll stop. You can use Google Docs to quickly e-mail documents to other people, yourself and to invite other people to work on a document with you. When the other person edits the document, it will sync with the file in your Home folder and you will have successfully Vanilla Ice'd the document.

My Two Cents: I obviously like Google Docs. However, like any well-meaning, up-and-coming web application, it has some work to do. Either way, you can see why these kinds of FREE and LIVE web applications the the thing of the future. They help make you more efficient, productive, and happy! I know that saving 80 bucks makes me happy.

Monday, February 23, 2009

Free Office Apps

Free and live office applications are the wave of the future. You pay (either directly or indirectly) for office applications like Microsoft Office and Apple iWork. These are great applications and they definitely are used by the majority of users. But, they aren't free and they aren't yet live. Free and live office applications are the wave of the future - so what does that mean?

Free Office Applications
: I will only be talking about free office applications from here on out. They are free because they are typically open source and because the organizations that developed them make them free. Star Office and Open Office are great examples of such applications. They are free and contain many of the same applications that Office and iWork contain. These applications provide very good free alternatives to software packages that cost around $80. However, they aren't live either. So let's get to what a live office application is.

Live Office Applications: Live means online. Thats the clearest definition. An online office application is one that uses web applications to create files (documents, spreadsheets, presentations, etc). That means that you can write a paper, for example, using your web browser and an online application. You can then save your document on your hard drive or online. Saving the document online will enables access to that file from anywhere where the internet is available (which is almost everywhere). These live web applications are available for free through sites like Google Docs. That is where these two concepts come together.

In the next 2 posts I will introduce 2 ways to make office files (documents, presentations, and spreadsheets) for free and online. Sorry this was a blah blah blah post. I probably could have just stopped writing after the first paragraph and just put blah blah blah and no one would have been able to tell the difference because they would have stopped reading by then.

Sunday, February 22, 2009

IMDB and IMDB... for music

IMDb - Internet Movie Database. If you want to know about movies, you go to the Internet Movie Database. Its a massive collection of pretty much every movie ever made. You have probably stumbled across it anytime you have googled a specific movie or even star. You can get plot summaries, cast listings (even click on specific stars and get all their career information), ratings (even specific information about exactly what is in movies), reviews, and a host of other information. I love to look at the top 250 movies and get ideas of movies to see or re-see. Well that's all fine and good...

BUT, WHERE IS THE OTHER IMDb (Internet MUSIC Database)? While various resources exist which definitely resemble an online music database, the most straightforward answer is that there really isn't one yet. Arguably, it seems only logical that there should be a database of information about music, bands, songs, or whatever. Compared against movies however, music is a much more complex animal. Think about how many groups and artists there are. Think about how many labels exist for each of them. Think about the vast complexity of information - from concerts to album releases to band members - that exists in the world of music. Truly, compiling a database for music is an extremely daunting task - especially in terms of what IMDB offers.

So what are some of the resources that can help in the quest for information about music:
  1. Google: obviously - this isn't the most all-in-one solution for information. Using it to get information about Music is more time consuming and daunting a task than other options on the list.
  2. iTunes (Amazon)- want information about music - go to where its sold! iTunes is one of the most vast compilations of music for sale on the web. Not only dones iTunes bring you information about artists and songs, it brings you information about artists and songs that are alike, thereby giving you a means to conceptualize what kind of music you are looking at and find more music that fits your taste. See Genius Sidebar. As for Amazon, same concept, just a little more difficult to use - in my opinion.
  3. SoundUnwound - this is Amazon and IMDB's early attempt at making a music database. Its in the beta stage of its development but to me, it seems to be a pretty darn good start. You can search any person, group, or band and it shoots back a list of results for what you might be looking for. I searched the band U2. There were thousands of matches for the band, but I knew from looking that the first option was the band summary. The site then provides the following: profile, discography, members, and "like U2... well check out..." Go check out a band or person you want and see how you like it. The benefit of using SoundUnwound to iTunes is that you get information about each individual in the band and you can use that to find what other band or music that person has influenced. I have a feeling I will be talking about this again in the future.
  4. Soundflavor - if you've heard it, they probably have it - Soundflavor compiles music by genre, decade, lyrics, songs, and artists so that you make music and video playlists. Postable on Facebook, MySpace, Friendster, blogs, and other websites, Soundflavor's more than a share-site, it's a place to discover. Search over the extended musical listings and discover new artists and sounds. Did I mention that some free music tracks are downloadable? With 30,000 songs and climbing, Soundflavor is definitely a resourceful guide to music! I will likely be re-visiting this site as well.
  5. Pandora - are you looking for music similar to music that you like? Why not just listen to some music on Pandora for awhile, pay attention to what you hear, and take note of what you hear?
  6. Any other ideas? Let me know!
So there you have it, IMDb and IMDb for Music! Search, Learn, Discover, Enjoy!

Friday, February 20, 2009

Fences

Today's post continues the "desktop organization" theme (please read the bonus post as well). Let me start by saying that I hate desktop clutter - especially desktop icons. I realize, however, that they can be a necessary evil and if you were to look at my desktop, you would see that I use it quite often to save and temporarily store files. If we have to use the desktop to store files and shortcuts I think we better keep them organized. We DON'T want to look like this:
I think I just threw up in my mouth...

Fences, by Stardock, is the free program that is going to help us use our desktops more efficiently. It is only for PC users. Fences does 3 useful things:
  1. Groups Like-Items: Fences builds small "yards" (thats what I call them) for desktop items - areas where you can place similar icons by whatever preference. After placing an item in the yard, the file snaps to that space and is "fenced" in. You can create as many areas as you want for whatever purpose you want and organize them how you want!
  2. Hides and Unhides ALL desktop items: Fences lets you, by the click of your mouse, hide the entire desktop so you don't have to see all the stuff you keep on it. When you need something, you just click anywhere in the desktop space to bring the items back.
  3. Customization: Fences lets you customize colors, sizes, shapes, etc. of the areas that you place your icons. It actually makes your desktop more compartmentalized, clean, and easy to use.
I don't have a lot of icons, but you can see that the areas are blue...

It's like placing clothes in all the right drawers - you put them there, the bedroom looks organized, you can customize the size and shape to fit your "room," and the clothes are hidden from view until you need them.

Overall, I really like Fences. Even though I hate the notion of cluttering up the desktop or overusing it, I know that a lot of people (sometimes myself to a very limited degree) do this and get buried by icons.

Right now the program is a free beta. I wonder if in the near future they are going to make a fully stable version and charge for it. Knowing Stardock, its likely. So download Fences now and take advantage of its features!

Holy Bonus! It's: Start Killer

Do you hate your Start menu icon? Well, I don't really have anything against mine personally, but Start Killer does - it hates ALL start menu icons. It reminds me of my good friend Star Killer:

If Start Killer could destroy Start menus with the
Force Push/Sith Lightning Zap or a lightsaber it would definitely be cool.


It doesn't. But it does do this:
Holy crap, the start menu is gone! And it used that dialogue box thingy to do it ...
definitely not as cool as Star Killer


Well, I just thought this little desktop tweak was kind of cool. It allows you to "kill" the start menu icon, thereby removing it from your start menu. The utility of this? It gives you more room on the taskbar for windows (and for killing stormtroopers - no, not as cool as Star Killer)... That's about all I can think of. You might consider using it together with Stardock's ObjectDock or RocketDock so that you have a Mac-like dock on the bottom of your screen and a minimized window bar on the top or sides without a start menu... I don't know, its just a cool tweak so use it if you want. I added it as a bonus because its not the MOST useful thing in the world and its definitely not as cool as Star Killer:
That's REALLY how he carries his lightsaber. I know... He's AWESOME!

Oh, did I mention the dude pulled a Star Destroyer OUT OF THE SKY!!?
Can Start Killer do that?

I'm not a nerd so stop thinking it!

Thursday, February 19, 2009

Virtual Desktops

Do you ever feel like you need more desktop space? Well, I certainly do. Check out my desktop:
It may look strange but what you are seeing is my entire desktop. It consists of 9 spaces. The basic idea is that by dividing up your desktop into multiple "virtual" desktops, you can maximize desktop organizations, efficiency, and use. Looking at my desktop you will notice that, starting in the top left and moving right, I have open Firefox, iTunes, VMware Fusion, Finder, iCal, iPhoto, a blank space, iMail, and VLC Player. What I have done is seperated out my desktop over virtual space so that its size is effectually 9 times larger than it would be without the Spaces. This is what it would look like if you had 6 "phyiscal" desktops:
That's ridiculous... nice command center!

Lets say I had a bunch of applications open on a single space. How would that look?
Thats just an example I found on Google Images- Notice how buried each window is?

It would obviously be a messy looking desktop and require you to switch between windows, minimize and maximize applications, and all sorts of painstaking things. Using a virtual desktop is like having an organized desk. It lets you put things in its proper space to be used when needed. Obviously, if all the things you used on your desk were stacked on top of each other, it would be pretty difficult to be efficient and use your desk space well. Anyway, I am able to virtaulize my computer desktop through a Mac Application called Spaces (click link for more info on that gem). But what about PC's?

FOR PC USERS: There are a host of virtual desktop managers out there. Many cost money, some are free. I have gone out and found 3 that I think are easy to use, work well, and - of course - are FREE. The apps I found are below. All you have to do is download the files and install the programs. They will require some up front configuration but that should be simple enough to figure out.
  1. VirtuaWin
  2. DoubleDesktop
  3. VistaVirtualDesktopManager
I have installed all three and found VirtuawWin to be the best. It can virtualize up to nine spaces and it looks pretty good. Double Desktop is a very simple dual desktop manager. I chose it because its really lightweight and very easy to use. Lastly, I included Vista Virtual Desktop Manager because it is lightweight, does a little more than Double Desktop, but will not let you virtualize quite as many desktops as VirtuaWin. I won't go into a tutorials for each but if you have any problems getting your virtual desktop set up, let me know and I will be happy to help. Lastly, I will be honest, these are harder to use than what comes with the Mac - but they do their job and thats what matters!

Note: if you start using a virtual desktop manager, I suggest starting with 2-4 spaces and then increasing as you may find need. I started with 4, went to 6, and now I use 9. It requires some getting used to, but once you do, you will find that you are much more organized and efficient! Enjoy!

Holy Bonus! It's: SpaceSuit

Bonus: SpaceSuit is basically an add-on to OS X's Spaces. It allows you to customize EACH space with its own wallpaper. Its really very simple and kind of fun because now each space can look different. It also allows you to title each space so you could call one space "Work" and the other "Movies" and another "E-Mail" or whatever. Kind of a nifty add-on to an already nifty application. Too bad Spaces doesn't just come with that capability... oh well.

Wednesday, February 18, 2009

Useful Guy Stuff

Assuming that more than 3 people are reading my blog - I want to tell everyone about a great new health/fitness/style blog: Useful Guy Stuff. The site is pretty straight forward... just read the title again. The great thing about it is that it gives straight forward advice to guys (and girls alike) about staying fit, being healthy, and staying on top of style. Girls will benefit because they can get their guys in shape and looking gooooood:

But really, I dig the blog. I dig it. Check it out, learn from it, start doing some of the stuff it talks about and you will likely start looking like this:

Overnight. (That's me - I am a living testimonial).

Tuesday, February 17, 2009

Wallpaper Juggler

Mac OS X comes with a handy little feature: you can change your wallpaper at a fixed interval between any wallpaper you want. I found a little application (Wallpaper Juggler) that allows you to do that on a PC as well. The application is free and it allows you to specify a location where you are storing images that you would like to cycle through your wallpapers. It requires Microsoft .net framework 3.5. Download Microsoft .net framework 3.5 here. Download Wallpaper Juggler here.

First you need to install the .net framework. Just double click the .exe file once your download finishes, accept the user agreement, and it will proceed to install your goods. The install requires the internet so make sure you have a good connection and it will all go much faster. It took like 5-10 minutes to do the install. You will have to reboot after the install finishes - no surprise there.

Installing Juggler is just as easy. Open the zipped folder you downloaded, drag and drop the Juggler icon in that folder to your desktop (this effectually unzips the file). Now, double click the Juggler.exe file (the one you just dropped on your desktop). Just go through the setup and you are good to go.

The best way to change between pictures is to create a folder and place the pictures you want to be your desktop background in it. Using the Juggler preferences menu, reference that folder by adding it using the "add" button. Now, set the interval you want for changes and pronto - you now have a cycling desktop wallpaper. Yay!

By the way, Windows 7 does this natively - so when that comes out in December 09, you will be able to change your wallpaper without any extra setup. Double Yay!

For more help with setup, go here.

Thursday, February 12, 2009

Microsoft Live / Hotmail POP3

Some Good News: I just found out that Microsoft liberated Hotmail and its Live accounts to 3rd party applications. Now people in the US that have Hotmail or Live accounts can attach said accounts to applications like Mail (Mac) and Thunderbird (PC and Mac) which formerly were restricted access. This is tremendously overdue news... but welcome nevertheless. Finally, I can use Mail to manage all my e-mail inboxes. My mailboxe in Mail now looks like this:

That's a beautiful thing. You can see that I can check all of my e-mail accounts using only one application. This can also be accomplished using the free mail application Thunderbird. I'll post something soon about how to use Thunderbird to manage your mail. For those of you with multiple accounts, this will really help you save time and energy. (You can use Outlook for all this stuff too...)

The following information will help you in setting up your mailbox (especially the incoming and outgouing server information):
POP server: pop3.live.com (Port 995) incoming server
POP SSL required? Yes
User name: Your Windows Live ID, for example yourname@hotmail.com or @live.com
Password: The password you usually use to sign in to Hotmail or Windows Live
SMTP server: smtp.live.com (Port 25) outgoing server
Authentication required? Yes (this matches your POP username and password)
TLS/SSL required? Yes

Wednesday, February 11, 2009

Viral Videos

You all know about and have seen viral videos even if you don't know the term. Wikipedia, that massive wealth of human knowledge, instructs us that: "A viral video is a video clip that gains widespread popularity through the process of Internet sharing, typically through email or Instant messaging, blogs and other media sharing websites." Viral videos are typically ultra popular and attract large audiences to sites like YouTube and Funny or Die. For example, the ever-popular Star Wars kid and Yuma Yuma kid, videos that sparked MILLIONS of views and thousands of response videos:


Corporations attempt to make viral videos either subtly advertising their products as in this BMW viral. Sometimes, however, they simply attempt to make a video that will grab a viewers attention then plaster their name on it for some positive association. Like this one:


Anyway, if you like viral videos and want to stay on top of them, Viral Video Chart will help you with that. The site tracks the videos by explosions in popularity and even provides you with a graph. What service! Enjoy!

Tuesday, February 10, 2009

iTunes: using iTunes to manage my music

Today is probably my last post for a little while about music. Today is all about music management. Music management is important because it leads to better organization. The better your music is organized, the easier it is to navigate your music and enjoy it. So that seems pretty simple to understand, lets learn some simple ways we can manage our music. Basically, this post is a crash course on using iTunes. It contains information and small tutorials that I think are good for new and old users alike. A lot of people have been using iTunes for years and years and don't know some of the simple wonders it can do!

First things first
You need to be letting iTunes manage your music for you. This sounds strange. It won't actually manage your music beyond organizing it into folders for you. YOU will be doing the management BUT you will be doing it through iTunes which is the easiest way I know to organize and manage your tunes. To turn this feature on:
  1. go to Preferences (or Settings)
  2. go to the Advanced Tab
  3. Make sure that the "Keep iTunes folder organized" box is checked
  4. Make sure that the "Copy files to iTunes Music folder when adding to library" box is checked.
The iTunes Music folder
Now that its managing your music, let me explain something. iTunes will now copy any music you add to your iTunes Library to the iTunes Music folder where it will be managed. So if you buy something from iTunes, that music will be put directly into your iTunes folder. If you rip a CD using iTunes, that CD will also be placed directly in your iTunes folder - you don't have to worry about those. IF, however, you have music that you got from a backup device or from a friend or whatever, that music will be COPIED to the iTunes music folder, meaning two copies will exist once you add it to your music library: the one in your iTunes Music folder and the original. The BEST way to add music that is in a format like this is: simply grab and drag the folders where the music is and drop it in the iTunes window. You will see iTunes process it and then it will show up on your screen.

At this point, you no longer need the original to play the music in iTunes because it is IN iTunes. So, unless that folder is on a backup device, you can delete it becuase you have a copy of it in your iTunes folder and you will be managing it through iTunes. All the music you have will now be stored SOLEY in your iTunes Music Library. It can be easily retrieved from that location, so don't worry, iTunes didn't steal it from you.

Managing your music
The next thing to explain is that ANY changes you make to your music in iTunes (i.e. track name, number, genre, etc) will be made TO THE FILE ITSELF. This means that your album art will be saved as well. Now, lets talk about editing a song, songs, or album information.
  1. First, information can be edited on any level: song-by-song, songs-by songs, album-by-album, albums-by-albums, etc.
  2. You can click on one or many songs or albums and press Command+i (Mac) or Control+i (PC).
  3. You can also right click and select Get Info. Either way, this brings up the song's information.
  4. You can edit this information by exploring any of the tabs.
  5. The most common change I make is highlighting multiple songs or albums, editing the info, and changing the genre of that music so it is all Rock, for example.
  6. Another common change you might need to make is to distinguish an audiobook from music. To do this, press command (control) + i on the should-be book, select the "option" tab, and change the "Type" to "audiobook."
A CAVEAT (warning): Do not change information for multiple tracks unless you want all those tracks to share that same information. For example, NEVER change the track title of multiple tracks or all the files will be titled the same. Items you might want to change on a general level: genre, type, rating, album name, etc.

Album Art

The last thing I want to talk about is Album Art. If you have music in you iTunes library that doesn't have album art (i.e. the album in "album view" shows up as a question mark) then you are missing out on one of the best aesthetic feautures of iTunes. To remedy this:
  1. first try right clicking the album and selecting "Get Album Artwork." Thats the easy and obvious way.
  2. If the artwork doesn't show up, its becuase the album is titled in some way that iTunes is not able to recognize. Album art works based on album titles. You should try going to the iTunes store to find that album and see what it is called in iTunes.
  3. Change the name of the album by clicking on it or all the songs in it and pressing command (control) + i. Then change the album title. That should do the trick (make sure you right click and select "Get Album Artwork" again).
  4. If not, then the last method is a sure fire way. Simply google the album,
  5. go to images,
  6. find an image that matches the album,
  7. save it to your desktop,
  8. highlight all the music that should have that image,
  9. then drag and drop the image into the bottom left corner window that says "Drop Image Here" or something like that.
That will attach the image to all the files you selected. You can do this with music that you know doesn't have artwork on iTunes and you can put in whatever picture you want. That's me next to Robin Thicke:

Well, thats it for today. I know it was a lot of reading but I hope you are now an expert on the basic iTunes music managment techniques!

Monday, February 9, 2009

iTunes: Using the Genius Sidebar


Holy cow another post about music stuff. Today we are talking about the Genius Sidebar. Named after these nerds:


Its okay to be a nerd though. Genius Sidebar is pretty awesome - I'll just let that cat out of the bag right now. However, it does have its limitations. We will address all of this as we talk about how you use it and how you benefit from it. (By the way, I am making the assumption that everyone has and uses an updated version of iTunes... its like water - you need it to live.)

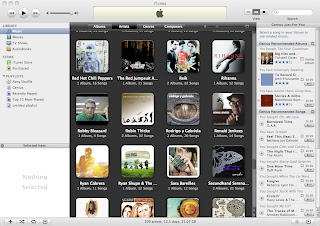
Using it: Well its pretty basic really. Start by making sure that its turned on:
  1. If its not already prompting you to turn it on (it would be doing this on the right side of your iTunes window - it shows up as a sidebar)
  2. then you need to go to iTunes preferences (or settings) and under the "General" tab,
  3. click the box next to "Genius."
  4. Boom baby - its on!
Next, let it do its "thang." It will go through all of your music and get a feel for what you like. Don't worry, there is nothing creepy about this (its not like iTunes is the Government). After it knows you and your music, it will be able to do a few amazingly simple and awesome things for you:
  1. Tell you what you want: Genius can now recommend songs and albums to you that you probably like based on what you already have. Generally, it just tells you what it recommends. Specifically, you can click on a song and it will tell you, based on that song, what you might like. This is beneficial to you because now you can discover new music or just remember music that you like but don't have. This is beneficial to iTunes because you are likely to use it to buy the music - the link is right there for you to click and buy it. Darn clever Apple... If you don't have money, you could always use Sad Steve.
  2. Make cool playlists: So lets say you are listening to a great song and you wish that there was some way you could hear other songs like it without having to go through your whole library to find the tunes. Just have genius do it for you. Seriously, 99 times out of 100 (I don't guarantee this number, but thats how I feel) it will hook you up with tunes that you really wanted to listen to. This is how: click on the song that you like, then click the genius icon (its in the bottom right hand corner of your iTunes window). Presto! There is your Genius playlist, intelligently playing the songs that you love.
  3. Do you have a new iPod? (New as in pretty darn new - latest generation new). Well, it should be able to use Genius too. I've only done this on a new iPod Nano. You can click on a song using the center button (as if you were making an on-the-go playlist, and it will give you the option to create a Genius playlist - JUST LIKE iTunes DOES FOR YOU!!) I imagine its even easier with a iTouch or an iPhone. Holy Cow!
So what are some disadvantages? Well, I wish that I could save some of the Genius playlists I have listened to. There may be a way to do this but I haven't figured it out. Things with iTunes are usually blatantly easy to figure out and I haven't yet which leads me to believe that it is impossible. You can export a song list to a text document and do something called "Copy to Play Order" but what the heck does that mean anyway. The other thing is that I wish it was more like Pandora and gave you the option to add variety to the playlists that you are listening to. I mean, what if I want more than one genre. Honestly, I would think that these features are forthcoming in the future versions of iTunes. So make sure you keep updating when that pesky updater pops up. Anyway, hope you enjoy using Genius!